I just picked up a Samsung SH-B123L/RSBP Blu-ray combo drive from newegg which works marvelously in conjunction with a couple of pieces of software to back-up each of my Blu-ray movies to hard drive, suitable for encoding into single full resolution, or iDevice-friendly, video files. Researched and played around with the process a bit for this tutorial, so here it goes:
- First, you're going to need to download and install the software tools to do the job. One of them is the free DVDFab HD Decrypter to actually rip the Blu-ray to disk. This is constantly getting updated to deal with the latest copy protections, so it's probably a good idea to check the site every time you're going to be backing up a newer disc. You'll also need Handbrake, free as well, to do the encoding of the ripped files to a single video file. The latest version released earlier this year, 0.9.5, finally supports reading Blu-ray disc structures, which makes this whole process infinitely easier.
- DVDFab HD Decrypter
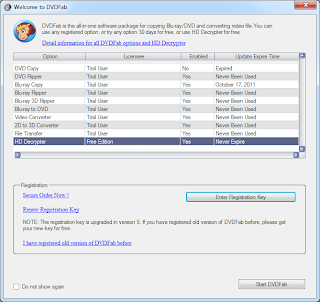
- Insert the Blu-ray into your drive, and fire up DVDFab HD Decrypter. In the Welcome to DVDFab window that pops up, select the option for HD Decrypter Free Edition, and click the Start DVDFab button to continue. Useful Trick: Once you've started using this application, you'll notice that the Update Expire Time column gets populated with an actual date when you won't be able to use the respective options anymore. Never fear, once you're in the application, go into the Common Settings and click the Default button to reset settings to, yes, default. You'll be advised to "restart the product to apply the changed settings." Once you do, for whatever reason, you'll find that all of the Update Expire Times have been reset to Never Been Used. Nice!
- DVDFab will now confirm the region code, and scan your Blu-ray in preparation to back it up. Once it's ready, select Blu-ray Copy --> Full Disc from the menu on the left-hand side of the application. For the Target settings at the top-right side of the application, click on the folder icon, browse to, and select a location where you would like the backed-up files to be stored. I tend to create and select a folder on my Desktop, just to keep things organized, as we won't be keeping the files after we're done with them. Note: Don't choose to back it up to an ISO file, as it takes twice as long (needs to copy from a temporary directory to the ISO container), and you would also need to worry about mounting the ISO prior to doing any encoding.
- Other than that, all other default settings should be just fine, just verify the BD50 drop-down setting at the bottom of the application to ensure a full-quality backup. Note: Make sure you have plenty of hard drive space (over 50GB obviously) in order to store the resulting files. Click the Start button in the lower-right of the application, and walk away for about a half-hour to let it do its thing. Mmm, coffee.
- Handbrake
- Once that's done, fire up Handbrake, and select Source --> Folder. Browse to and select the folder specific to your disc's back-up under the folder that you chose in DVDFab. The subfolder structure will be \FullDisc\[Movie], so you would select the [Movie] folder. Handbrake will now do its own scan of the backed up files and present you with all of the Titles and Chapters that it was able to parse from them. Under the Title drop-down in the Source section, select the longest-running title, which generally corresponds to the main movie, rather than any special features, preview trailers, etc. Note: There may be a few titles that are either close or identical in length, so you'll need to try a Preview of each one to tell the difference between them. Usually it's something like an extended version vs. director's commentary vs. theatrical release.
- In the Destination section, select a target folder and file name for your resulting video file, ending in .m4v.
- In the Presets section to the right of the application, select Normal if you want a full-resolution file, or select the corresponding Preset for your target iDevice. Note: The iPad Preset plays just fine on an iPhone 4, so you won't need two separate encodings if you have both devices.
- In the Output Settings section, select a Container of MP4 File, and make sure that the checkbox for Large file size is selected. If the resulting video file is greater than 4GB in size, highly likely, it will be unplayable unless this option selected.
- Select Preview from the top of the application, and in the Video Preview "window" that pops up, select a Start at Preview and a Duration. Click Play with QT or Play with VLC to get a quick encoding sample to make sure you'll be getting what you expect. I like to try a few different 10-second Start at Preview numbers just to be certain. If you've chosen the wrong title, go back under the Title drop-down in the Source section, and select a different one to preview.
- Once you're certain that everything is how you'd like it, click Start at the top of the application and let it rip!

At the end of the encoding process, you should be left with a nice, playable MP4 video file, suitable for HD streaming or portable iDevice viewing by loading it through iTunes! If you're satisfied with the results, go ahead and delete the original disc back-up files and reclaim your precious GB's of drive space. Hope this helps to simplify the process for anyone looking to back-up their Blu-rays!


